Before you can embark on your landscape photography adventure, you must know the different types of light you will be working with. During the daytime hours, the light is every changing, and can have a dramatic impact on your landscape photos depending on what kind of light you are working with.
With the sun low in the sky on a clear day, the lower angle of natural light will drag shadows horizontally across your landscape which will add dimensionality to your images. Likewise, with the sun high in the sky or when the weather is cloudy, the lighting will be flatter and not as visually interesting, though usually easier to work with in landscape photography.
The first criteria for the type of light you will be working with, is the time of day (the other criteria being weather). With landscape photography you are working with the sun (or lack thereof), and the sun is always moving in the sky, so the position of it will make a huge difference in what type of lighting you have on your landscape.
Time of Day
Time of day can be broken down into several unique phases during the day (in order):
- Blue Hour (Dawn)
- Golden Hour (Sunrise)
- Morning
- Midday (High Noon)
- Afternoon
- Golden Hour (Sunset)
- Blue Hour (Dusk)
- Nighttime
And the cycle repeats, day in and day out.
In most cases, the light from the morning and afternoon phases are of the same quality but from different directions. The same can be said for the blue hours and golden hours of the early morning and late evening.
Let’s discuss in detail the differences in those phases of the day, weighing the pros and cons of each, starting with Morning/Afternoon light:
Morning/Afternoon
High contrast, warm colors.
Pros: Long time frame to shoot in; predictable light.
Cons: Not the best light; but better in most cases than midday light.
Recommended Filters: Circular Polarizer or Graduated ND
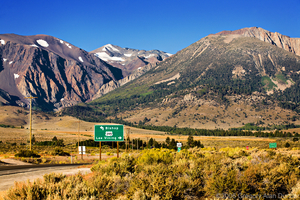
Shooting North at the road sign to Lee Vining, during the early morning hours. Image © Gregory A. Dunbar
Using a polarizing filter can be great at this time of day to deepen the blue in the sky, and increase the color saturation in the landscape. A graduated ND filter may also be recommended if you have a brighter half of the image you would like to darken to balance out the scene. Rarely during this time are we shooting directly towards the Sun; instead keep the sun at your sides to drag the shadows across the landscape in your image, or shoot with the Sun behind you illuminate the scene in front of you with a bright light.
One good aspect to shooting during these lighting conditions, is predictability. You have a wide window of time to shoot in, and the light doesn’t change very much in that time frame. Because the Sun is higher in the sky, you do not have to worry about elements such as mountains, buildings or trees blocking the Sun from illuminating your scene.
Midday (High Noon)
Low contrast, neutral colors.
Pros: Long time frame to shoot in; predictable light.
Cons: Usually bland lighting, sometimes produces uninteresting scenes.
Recommended Filters: Circular Polarizer
The middle of the day with the Sun high in the sky produces very uninteresting lighting and low contrast due to very narrow shadows on the landscape. The light from the Sun comes from directly above, which puts the shadows from objects directly below them. The colors also tend to be very neutral, and not warm like during the golden hour, or soft and cool like during the blue hour. It’s generally regarded as the worst time to take landscape photos, but can have it’s advantages.
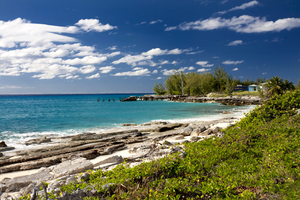
View from Cockburn Town, San Salvador, Bahamas taken midday with a polarizing filter. Image © Gregory A. Dunbar
I personally do not plan many landscape photo adventures during the midday, unless one condition is met: Partly cloudy weather. The midday can also be a great time to bring out the blues in the sky using a polarizer, and if you are graced with a partly cloudy but otherwise beautiful day, the polarizer will really make the clouds stand out.
The Golden Hours
Highest contrast, warmest colors.
Pros: Beautiful light, amazing skies.
Cons: Short time frame to work with; unpredictable light.
Recommended Filters: Graduated ND
The golden hours are often regarded as the best time of day to take landscape photos due to the golden light from the sun, and the high contrast from the light dragging across the landscape producing brilliant shadows. This unique time of day is the hour after Sunrise, and the hour before Sunset, with sunrise defined as the time the Sun first crosses the horizon, and sunset defined as the time that Sun sets behind the horizon for the night.

Shooting West towards the South Tufa at Mono Lake during the morning golden hour. Image © Gregory A. Dunbar
Of course the best time of day to shoot landscapes is also the hardest – you only have one hour to work with, and during that hour, the light changes fast as the Sun races towards the horizon. It’s best to scout out your intended landscape ahead of time, to gauge how the light will fall on it during the golden hour you choose.
Speaking of choosing a golden hour, do you go for Sunrise, or Sunset? Really it depends on your scene – for example, mountains that face West may be illuminated with golden light during the evening golden hour. During Sunrise, they may be completely silhouetted but have a beautiful sky behind them; it really depends on what kind of effect you are going for and why scouting the scene your intend to shoot at a prior time may be beneficial.
But there are some other factors to consider, as well. Sunset tends to be easier, as the scene starts off bright and gradually builds to the point of peak Sunset when the Sun crosses the horizon, and the light is the best. This gives you some time to prepare. Sunrise on the other hand starts off dark, when the Sun peeks over the horizon tends to be the best light, and only gets worse from there on out. But Sunrise can also provide it’s benefits, such as fog rolling across the landscape or dew on the grass adding interest to your scene.
The Blue Hours (Twilight)
Lowest contrast, coolest colors.
Pros: Interesting light, soft colors.
Cons: Short time frame to work with.
Recommended Filters: Graduated ND
The blue hour describes the time that is one hour before Sunrise, or one hour after Sunset. The Sun either hasn’t come up yet, or has disappeared for the day, but the sky is still light. There is neither full daylight; nor complete darkness. More often than not, it’s actually less than an hour in length. A handy calculator at BlueHourSite.com can tell you exactly when the blue hour will be at your location.
What white balance setting do you use during the blue hour? Usually during the golden hour I am using “daylight” white balance on my camera, and for the blue hour, I also use “daylight” white balance. This will produce some very cold-toned images during the blue hour ranging from blue to purple toned, but this couples with the long exposure will really let the camera soak in that other-worldly light. Of course if you are shooting in RAW (you should be) you can always change the white balance afterwords.
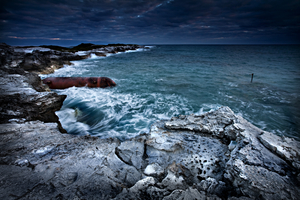
Rice Bay Shipwreck, San Salvador, Bahamas during the blue hour after Sunset. Image © Gregory A. Dunbar
In general, shooting landscapes towards where the Sun set during the blue hour will produce the best looking skies. But sometimes if you are lucky, in the opposite direction of where the Sun set you can find a phenomenon known as Alpenglow, where a thin red band of light appears on the horizon. This is most visible on high horizons such as mountains opposite of the sun, but if conditions are right can also be observed in the sky.
Nighttime
Pros: A good time to really experiment with your landscape photography.
Cons: Hard to compose the scene; including focusing.
Recommended Filters: None
Nighttime is really the time to experiment. There’s really so much you can photograph during the night – perhaps a moonlit landscape, or a landscape featuring the stars. Maybe you would like to try some painting with light (article coming later) or some star trails. By chance is there a meteor shower happening soon? Whatever you choose to photograph at nighttime, be ready for some experimenting.
Nighttime photography will of course absolutely require a tripod; you are probably going to be using some very long exposure times. Unless you are dealing with a full moon or shooting under artificial lighting such as a cityscape, you will probably struggle with composing your scene – it’s dark out! If you are not familiar with your camera, you may even have trouble working it. I highly recommend a compact, but bright and far-throwing flashlight. Personally I use the LED LENSER M7RX flashlight, it’s not cheap, but for the size it’s perfect – and it throws out 600 lumens of power. I can brightly illuminate the landscape hundreds of feet ahead of me in total darkness, allowing me to compose my scene and get the correct focus. No matter what flashlight you get, make sure it’s bright and throws far.
Weather
Time of day is not the only factor to consider that affects the quality of light in your landscape images; weather also plays a big role.
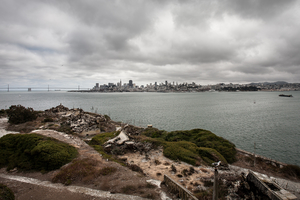
San Francisco from Alcatraz, California. Sometimes overcast skies can make a mean-looking photo. Image © Gregory A. Dunbar
The advantage to overcast skies for landscape photography is that your light will not change (predictability), and the images will be easy to take. Of course, usually this makes for boring scenes. Occasionally, if the overcast sky has some variance in the clouds (light clouds with dark clouds) you can capture a pretty mean-looking sky, with the use of a light graduated ND filter to darken the clouds in the sky a bit.
Speaking of clouds – my favorite type of day for landscape photography is a party cloudy day. It adds interest to the sky having those clouds in there – and it also lets the light from the sun into the scene. A partly cloudy day is where you are usually going to get your best landscape images throughout the day.
When it rains during the day but clears up during the golden hour, you can usually count on a pretty amazing Sunset. Definitely try for a landscape with a low horizon to get that beautiful setting Sun.
Storms can be pretty amazing to photograph. Just be careful not to get hit by lightning or swept up by a tornado!
Landscape 101-4: Filters (Coming Soon!)


[…] 3: Finding The Light […]